
What is MANUAL EXPOSURE in photography: Guide for beginners
Table of Contents Show
Introduction - What is Manual Exposure in photography
Diving into the intricate world of photography, the mastery of manual camera settings stands as a fundamental cornerstone, empowering photographers with the creative control necessary to realise their vision. By understanding and manipulating these settings, artists can transcend the limitations of automatic modes, achieving precise exposure levels, and crafting images that truly resonate with their intent. This guide illuminates the path for beginners, laying the foundation for an enriching journey into the art and science of photography. With a setting on manual mode, it delves into the essentials of the exposure triangle, metering system, and the nuanced balance between long exposure, overexposure, and underexposure, enabling photographers to capture scenes with unparalleled clarity and creativity.
As we journey through this guide, readers will be equipped with a camera manual settings cheat sheet, a valuable tool for those venturing into manual mode for the first time or seeking to refine their understanding of manual camera settings. From the theoretical concepts of the exposure triangle to practical steps for leveraging the metering system for optimal results, this article covers the key settings and techniques instrumental in mastering manual exposure. Furthermore, it will explore the significant advantages and potential drawbacks of manual exposure, offering readers a comprehensive understanding of when and how to apply these techniques to enhance their photographic practice. Empowering photographers with knowledge and skills, this guide aspires to transform enthusiasts into adept visual storytellers, proficient in the art of creative control through the effective use of manual camera settings.
Overview of Manual Exposure in Photography
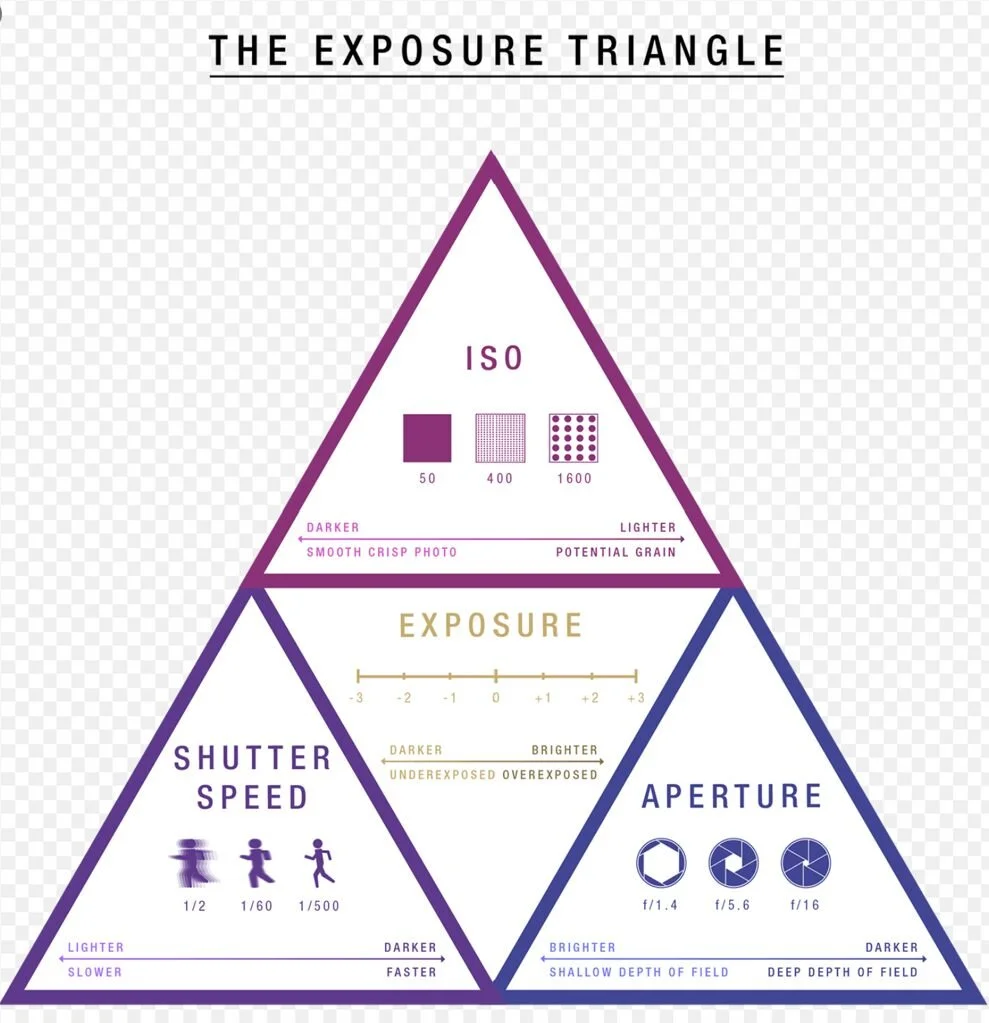
Photographing in manual mode introduces a level of flexibility and creative control that automatic settings simply cannot offer. When a photographer opts for manual exposure, they assume full responsibility for adjusting the three pivotal elements of the exposure triangle: shutter speed, aperture, and ISO. These settings collectively influence the brightness, sharpness, depth of field, and overall quality of the photograph, determining the meaning of exposure in photography.
Complete Control of Camera Settings
In manual mode, every camera setting is at the photographer's discretion, allowing for precise adjustments to each component. This control is particularly beneficial in challenging lighting conditions or when aiming for specific artistic effects like high-key photography or low-key photography. For instance, by modifying the aperture, photographers can alter the depth of field. A wide aperture (e.g., F/1.8) will produce a shallow depth of field, emphasising the subject while blurring the background—ideal for portraits. Conversely, a narrow aperture (e.g., F/16) increases the depth of field, ensuring that everything in the frame, from foreground to background, remains in sharp focus, which is preferred for landscape photography.
Shutter speed adjustment is another advantage of manual mode. Fast shutter speeds (e.g., 1/1000th of a second) can freeze fast-moving subjects like wildlife or athletes in motion, capturing every detail with clarity. On the other hand, slower shutter speeds (e.g., 1/30th of a second) can introduce motion blur, adding a sense of movement to subjects like flowing water or speeding vehicles. This is what exposure in photography is all about.
ISO control further enhances the photographer's ability to shoot in varied lighting conditions. A higher ISO enables shooting in low light without sacrificing the shutter speed or aperture settings. However, it's crucial to manage ISO carefully as higher values can introduce noise, affecting image quality.
Manual mode is not just about technical control but also about artistic freedom. It allows photographers to experiment with different combinations of settings to achieve the desired visual effect, making each captured image a unique expression of their creative vision. This is the essence of exposure photography.
Key Settings in Manual Exposure
ISO Sensitivity
ISO sensitivity is a critical setting that adjusts the camera's light sensitivity, directly influencing image brightness. The base ISO, typically around 100, offers the highest image quality with minimal noise. Photographers increase the ISO number to brighten photos (by speeding up exposure time) in darker environments, balancing the need for light with the potential increase in noise, which can degrade image quality. High ISO settings are essential in low light conditions but should be used judiciously to avoid excessive graininess in the photos. Understanding what ISO is in photography is crucial for achieving proper exposure.
Aperture and Depth of Field
Aperture controls the size of the lens' diaphragm, affecting the amount of light that reaches the camera sensor and the depth of field in the images. Measured in f-stops, a lower f-stop number (e.g., f/1.8) means a wider aperture, allowing more light and creating a shallow depth of field. This effect is ideal for portraits where the subject is in sharp focus against a blurred background. Conversely, a higher f-stop number (e.g., f/16) results in a narrower aperture, less light, and a deeper depth of field, suitable for landscape photography or where clarity throughout the entire scene is desired. Aperture is a key component of exposure definition in photography.
Shutter Speed and Motion
Shutter speed determines how long the camera's shutter is open to expose light to the sensor. Fast shutter speeds (e.g., 1/1000th of a second) freeze motion, perfect for capturing fast-moving subjects with clarity. Slow shutter speeds (e.g., 1/2 second), on the other hand, allow more light and can create artistic blur effects in moving subjects, such as waterfalls or bustling city scenes. The choice of shutter speed has a profound impact on both the exposure and artistic expression in photography, making it a pivotal tool in the photographer's toolkit. Shutter speed is essential to the exposure meaning in photography.
Steps to Use Manual Mode Efficiently
Setting Aperture First
When using manual mode efficiently, the first step is to determine the appropriate aperture based on the subject and desired depth of field. For instance, capturing a solo portrait or a couple close together often requires an aperture around f/1.8 or f/2 to focus sharply on the subjects while blurring the background. If the subjects are slightly apart, an aperture of f/2.8 or even f/4 ensures everyone remains in focus. For larger groups, start at f/2.8 and adjust upwards to f/4 or higher, depending on the group's size and arrangement. This is a key aspect of what exposure is in photography.
Adjusting Shutter Speed Next
Once the aperture is set, the next focus is on shutter speed, which should align with the subject's movement. For static subjects or stationary objects, a shutter speed of 1/60th of a second may suffice. However, for subjects in motion, such as walking or dancing slowly, shutter speeds around 1/200th of a second are ideal. For faster movements, like quick dancing or jogging, it's crucial not to drop below 1/500th of a second to capture sharp, freeze-frame images without blur. Shutter speed is a fundamental part of the exposure meaning in photography.
Finalising with ISO
After setting the aperture and shutter speed, the final step is adjusting the ISO to achieve the correct exposure. This adjustment is straightforward: if the image appears too dark, increase the ISO until the desired brightness is achieved; if it's too bright, decrease the ISO. This simple method allows photographers to quickly find the right exposure for their specific shooting scenario, ensuring the image is neither overexposed nor underexposed. ISO is a key factor in determining exposure in photography. Alternatively you can set ISO to Auto and allow the camera meter to calculate the required amount of ISO to expose the image correctly.
Advantages and Disadvantages of Manual Exposure
Manual exposure in photography provides photographers with unparalleled control over the final image, allowing them to manipulate settings such as ISO, aperture, and shutter speed to achieve their desired artistic effects. This control is particularly beneficial in challenging lighting conditions or when aiming for a specific aesthetic. However, mastering manual exposure requires a deep understanding of photography principles and can be more time-consuming than using semi-automatic modes.
Pros and Cons
One of the main advantages of manual exposure is the ability to tailor camera settings to create the exact mood and effect desired in photos. This includes manipulating depth of field, motion blur, and dynamic range. Manual settings also allow photographers to override the camera's metering system in tricky lighting situations, such as backlighting or high-contrast scenes, ensuring more accurate exposures.
Conversely, the use of manual exposure has its drawbacks. It demands more time and attention to adjust settings for each shot, which might cause photographers to miss fleeting moments. Additionally, there is a steep learning curve associated with understanding how each element of the exposure triangle affects the others and how to effectively use tools like histograms and exposure compensation.
When to Use Manual Exposure
Manual exposure is most advantageous in stable or controlled lighting environments, or when dealing with difficult lighting conditions. It is ideal for scenarios where consistency in exposure is crucial, such as studio photography, long exposure, and HDR imaging. Manual settings are also beneficial when creating silhouettes or shooting in low light conditions where photographers need to fine-tune exposure settings to capture the desired effect.

Manual exposure as the camera meter cannot calculate the ever-changing light situations for a firework display
However, manual exposure might not be the best choice in fast-paced or dynamically changing environments, such as sports or wildlife photography, where quick adjustments are necessary. In these situations, photographers might benefit from semi-automatic modes like aperture or shutter priority, which still offer some level of control but with faster response times.
Ultimately, the decision to use manual exposure hinges on the photographer's specific needs, experience level, and the particular demands of the shooting scenario. By understanding when and how to effectively use manual settings, photographers can enhance their creative control and produce more compelling and technically sound images.
Conclusion - What is manual Exposure
Through the exploration of manual exposure in photography, we've traversed the crucial elements that form the backbone of mastering manual camera settings. From understanding the intricate balance of the exposure triangle—ISO sensitivity, aperture, and shutter speed—to leveraging these components for creative control, this guide has aimed to equip beginners with foundational knowledge and skills. Emphasising the significance of manual mode, we've unveiled how it empowers photographers with the precision and freedom to capture their artistic vision, outlining both the advantages and challenges that come with taking full control of the camera settings.
As we conclude this journey into manual exposure, it's clear that the pathway to mastering these skills is both an art and a science, requiring patience, practice, and a deep passion for photography. While automated modes offer convenience, the deliberate choice of manual settings opens up a world of possibilities for crafting visually stunning and meaningful images. The decision to engage with manual exposure, guided by an understanding of when and how to apply these techniques, marks a significant step towards becoming a more proficient and expressive photographer, capable of conveying compelling stories through the lens.
FAQs - What is manual Exposure
What does manual exposure mean in photography?
Manual exposure in photography refers to the process where the photographer manually adjusts the aperture, ISO, and shutter speed independently to control the image's exposure. This approach allows for complete creative control over the final image appearance. For more details, refer to explanations on Shutter Speed, Aperture, and ISO.
What is the basic concept of exposure in photography for beginners?
Exposure is a fundamental concept in photography that involves the amount of light that enters the camera when a picture is taken. When you press the shutter button, the camera's aperture opens, allowing light to hit the sensor, which then records this light as visual data. The duration and intensity of this light exposure determine how the image will look.
What is a common guideline for setting manual exposure?
A widely accepted guideline for manual exposure is to set your shutter speed to twice your frame rate. This guideline, often referred to as the 180° Rule, helps achieve the most natural-looking motion blur in your photos.
When should you use manual mode in photography?
Manual mode is ideal when consistency is crucial across multiple shots. For instance, when shooting panoramas, it's important to maintain the same settings to prevent the camera from altering the exposure due to changes in lighting as you capture different sections of the panorama. Using manual mode ensures that exposure remains consistent throughout the series of shots.
